
Travelling the green road: How to limit the environmental impact of your caravan
Contact us on0800 975 2931

Whether it’s company branding or a fun addition that you’ve made to your caravan, there are a few common issues associated with decals that are worth being aware of. Fading is one of the most frequent problems, often caused by UV exposure and other environmental factors. Peeling can also occur, especially if the decals weren’t given time to properly bond when applied - they should be left to dry for at least 24 hours, ideally 48 hours, before being exposed to water or before the caravan is moved. Damage can also happen from scrapes, or from when the decals shrink in the sun.
When cleaning near your decals, it’s best to use a soft brush and warm soapy water only - any harsh chemicals or vigorous scrubbing can make things worse. Cheaper stickers also tend to have a much shorter lifespan than more expensive, higher-quality ones. Another thing to note as an issue is the potential for a ‘ghost effect’. This is when decals that have been on for some time are removed, leaving behind a faint outline on the paintwork that can be difficult to get rid of.

There is a good reason for potentially adding your own decals, however. While the primary purpose of them is often decorative (or to show the name of the manufacturer, of course), some owners have also suggested they act as a deterrent to thieves, making their caravan appear more identifiable or traceable, which is a good thing.
If a decal starts peeling or comes off completely within a few months of purchase, it’s worth speaking to your dealer, especially if the caravan is still under warranty.
So, whilst we may not be able to do much about UV damage and fading, it’s clear that preventing rigorous scrubbing, and avoiding harsh chemicals, will go some way to preserving your decals.
Let’s have a look now at how to apply them properly, with a view to keeping them in place and looking good for some time to come!
![]()
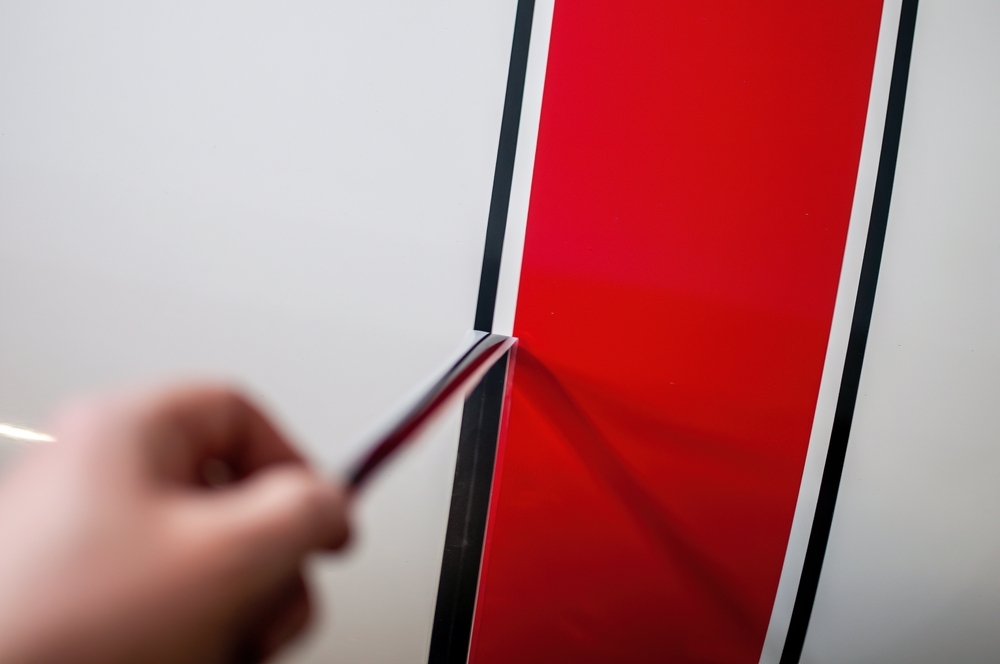
How to apply decals properly
The right preparation is key, so you should start by thoroughly cleaning the surface area where the decal will be applied. Remove all the dirt, grime and any other residue to make it easy to adhere, using a degreaser or rubbing alcohol to degrease the area properly until it’s really clean.
To have the best change of success, you should apply decals when the temperature is warm and dry, as any excessive heat or moisture can affect the adhesive's performance. If possible, do the work somewhere that will avoid dust and debris from attaching itself to the caravan.
Position the decal in the desired location, ensuring it is properly aligned and where you want it to be. If it’s a large decal, you might consider using masking tape to secure one edge, allowing you to work from a fixed point.
Lightly mist the surface and the adhesive side of the decal with a soapy water mixture, as this will aid in positioning and prevent any premature sticking in case you need to make any adjustments.
Starting from the centre or a fixed edge, use a squeegee to gently smooth the decal onto the surface. Apply firm, overlapping strokes, working outwards to expel any air bubbles or excess soapy water.
Once the decal is on, use the squeegee or your fingers to smooth out any remaining bubbles or wrinkles, working from the centre towards the edges. Also, applying gentle heat with a heat gun can aid in securing the decal and mould it to any curves or ridges on the caravan.
Allow the decal to completely dry and avoid touching it or disturbing it at this point.

How to get decals off
If you want to remove any decals, you can try to remove them by heating them up with a heat gun or hairdryer to soften the adhesive. Then, you can gently peel the decal off, starting from one corner. Use a plastic scraper to help lift it, and remove any remaining adhesive residue with WD-40 or an adhesive remover, such as a specialist decal residue remover which you can buy online from places such as Amazon.
If you have any other tips for applying and removing decals, do let us know below!
Travelling the green road: How to limit the environmental impact of your caravan
The real costs of full time caravanning in the UK
Our top 10 tips for booking the best campsites
